Thursday, October 24, 2013

Week Three: Avgolemono, Cucumber Mint Salad, and Baked Apples with Mexican Chocolate

The weather in Seattle this week has been beautiful if a little spooky. A long-lasting temperature inversion has trapped us in layers of cotton wool that scatters the sunlight, making maple trees look as if they're lit from within.

In other words, great soup weather.
 
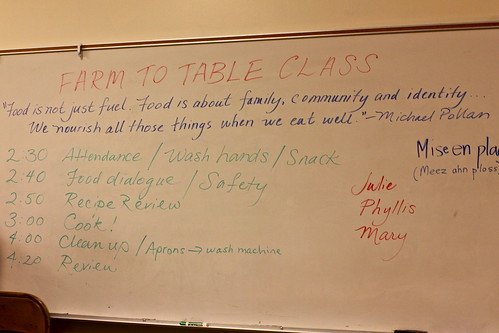
For this week's lesson, I wanted to practice timing recipes so that several dishes are served at the right temperature, while also introducing the kids to tempering, fat-oil ratios, emulsions, and (as always), cooking with mostly-organic, mostly-whole foods. We also needed some downtime to screen the "Nourish" documentary. (We'll hear more about that next week, with student volunteer "Professor Eric" leading the discussion.)

After checking in and washing up, we began our lesson with a snack of edamame, unsweetened mint tea, and a review of ingredients. The students discussed which foods were whole, which processed, and which could be grown locally (yes to cucumbers and mint and apples, no to lemons). We talked briefly about how to make broth of chicken bones from rotisserie or home-roasted chickens.

IMG_0675Next we examined our recipes for prep times and determined that the cucumber salad, which needed to be chilled, would be our first point of attack. 
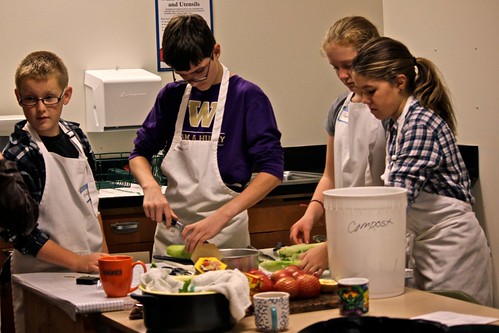
Phyllis demonstrated decorative ways to peel cukes, and how to roll a lemon and slice it (horizontally) for the most juice. Our prep lead Matthew did a fine job with a sharp knife I brought from home (this prompted one student to say "only a teacher can bring knives to school!'). Two students donned gloves to dice a jalapeno, something I wish I'd learned at their age; it would have spared me a memorable pepper accident. (Children, never rub your eyes after touching peppers!)

When it was time to dress the salad, I asked the crew why we should aim for a "three-to-one fat-to-acid ratio." Their stares made me realize I needed to backtrack. Because these kids are so mature, I forget they are not adults, with decades in the kitchen! (Later my tween would inform me that for most kids, fat is an insult, and acid means an illegal drug. Yikes.)

After I explained the terms, I asked how much olive oil we would need to get 3:1 fat to acid with one tablespoon of lemon juice. There were some wild guesses; none of them the correct. The clock was ticking, so I gave them the answer and decided to postpone the ratio lesson until I have some visual aids. The salad was seasoned (amid much laughter about whether it was oversalted) and put away to chill.

Half the class then began washing, splitting, and coring apples, using a horizontal cut—a clever way to get a secure base—demonstrated by Phyllis. Next came the chopping of the Mexican chocolate (which is admittedly a a highly-processed, sugary treat, but only one teaspoon is needed per serving, and it really makes the dish). The kids also figured out how to triple the recipe.

Under Mary's oversight, the rest of the class whisked eggs and measured broth and rice for the soup. Avgolemono is one of my kids' favorite dinners, and also happens to be a low-risk way to learn about tempering eggs (puddings are far less forgiving). It came together quickly, and no sooner was the soup simmering than the apples were ready for the oven.

IMG_0683
That cooking takes time is the primary reason people give for not doing more of it, so I wanted to give our students the experience of creating a tasty "scratch" meal in less than an hour. As the apples went in the oven, they raced down the hall to watch a movie. When they returned thirty minutes later, there was hot soup, cold salad, and perfectly roasted apples to enjoy.

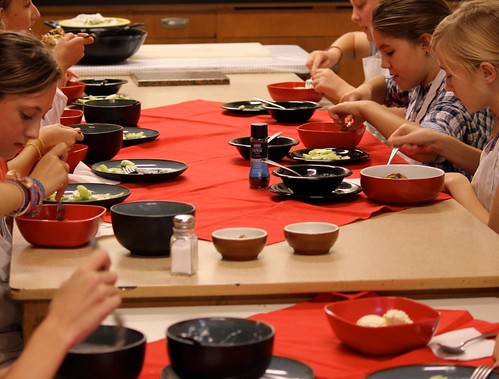
Having students lead different functions has been a great way to juggle responsibilities. Plating lead Emma adorned each dessert with mint as the soup was ladled out. Gratitude lead Chloe expressed thanks for the food and for the class. (I was pleased to see that everyone waited until soup and salad were served, and thanks given, before digging in.)

Unfortunately, KP (kitchen patrol aka dishwashing) lead Eliot discovered, as our two hours ended, that she was out of a job. How silly of me, in a lesson about timing meals, to short KP! I'm still learning. Next week will be better.

***

Recipes

Avgolemono (Egg Lemon Soup)

Adapted from Epicurious, this easy soup is delicious! It can be made even richer with homemade stock and mirepoix, fresh herbs, and shredded chicken.

Serves 6-8
  • 2 quarts (8 cups) chicken broth
  • 1/2 cup uncooked rice (or orzo)
  • Salt and pepper to taste
  • 6 eggs
  • 6 tablespoons lemon juice (from 2 or more lemons)
  1. In a large saucepan, bring broth to a boil.
  2. Add the rice or orzo and cook until al dente (about 20 for rice, 7 for orzo). Reduce heat to low; simmer.
  3. Meanwhile, in a medium bowl, whisk eggs with lemon juice.
  4. Ladle about 1 cup of the hot broth into the egg-and-lemon mixture while whisking, to temper eggs. 
  5. Add the mixture back to the simmering saucepan. Stir until the soup becomes opaque and thickens as the eggs cook, 1 to 2 minutes. Season with salt and pepper, and garnish with fresh dill, if desired. Enjoy!
***

Cool Cucumber Salad with Mint

Serves 8
  • 4 large cucumbers, peeled, seeded and sliced in crescent moons
  • 3 tablespoons olive oil
  • 1 tablespoon lemon juice or vinegar
  • 3 tablespoons fresh mint, chopped
  • salt and pepper to taste
  • 1 tablespoon minced hot pepper if desired
Mix all ingredients, adjust seasoning, and chill before serving.

***

Baked Apples with Mexican Chocolate

Adapted from Martha Stewart Living, this filling dessert can be varied with pecans and dried raisins or cranberries added with chocolate. 

Serves 4 (half apple per serving)
  • 2 medium apples
  • 1 ounces Mexican chocolate, such as Ibarra, coarsely chopped
  • 1/2 stick (4 tablespoons) unsalted butter
  • 1/4 cup water
  1. Preheat oven to 400 degrees. Halve each apple lengthwise (north pole to south pole). Using a melon baller, scoop out seeds, forming a small crater in center of each half.
  2. Fill each crater with heaping teaspoon of chocolate. Cut half the butter into small pieces, and divide among apples, placing over chocolate.
  3. Place water and remaining butter in a baking dish. Place filled apples in dish. Bake until a paring knife inserted into apples meets no resistance, 20 to 30 minutes.
To serve, drizzle with juices.

Thursday, October 17, 2013

Week Two: Veggie Quesadillas, Warm Berry Sauce with Yogurt and Almonds


One of the delights of learning to cook is discovering that when things go wrong, it's usually not that big of a deal. Our second week got off to a bumpy start, with one volunteer out sick and another running late, plus a kitchen that seemed to be fighting us at times. The first lesson was "how to cut an onion" (hat tip to Cynthia Lair for the "north pole-south pole" metaphor in her TedxRainier talk). However, with only one really decent knife in the kitchen, the kids had to take turns with it. It was an opportunity to talk about the value of having the right tool for the job, but primarily a lesson in frustration.

Later one of the vintage electric stovetop burners burst into flames, filling the room with smoke. We opened windows and teachers down the hall brought us fans so we could breathe. (No doubt they worried we'd burn down the building!) Crisis averted, we moved to the other stove.

Things went relatively smoothly after that, although the fruit sauce didn't thicken completely and a couple of quesadillas had minor "issues." But the results were flavorful and the kids were happy. If you had told me last week that a dozen kids would be begging for more KALE quesadillas, I would have asked what planet you lived on. Kale can be too bitter for kids' palates (my own tend to tolerate more than enjoy it). I think the magic to this recipe is the caramelized sweet onions. Or maybe it's the thin chiffonade (no big chewy pieces)? Or the the kick from the spices, or the bite of sharp cheddar. In any case, it was a hit, and several children said they would make the recipe for their families. The recipes gave us an opportunity to talk about mince, dice, chiffonade, saute, toast, simmer, and boil. If the kitchen had a microwave, I would have demonstrated how quickly frozen berries can become fruit sauce.

One of my favorite parts of the class is discussing the ingredients for each recipe.
  • Which ingredients are whole? 
  • Which are prepared?
  • Which ingredients are in local? 
  • Which are in season? 
Questioning sources is the beginning of any education in critical thinking, and no less so for the thoughtful eater. It was fun to argue about whether salt is a whole or processed food, and one student volunteered to do some research on how salt is refined. The Nourish project offers several lessons on the food system that we're incorporating into the class (as well as the movie, narrated by Cameron Diaz, that I hope to show next week).

Another class routine is having a "moment of gratitude" before eating. Each week a different volunteer week expresses what he or she is grateful for (it would be nice to go around the table, but it would take far too long). There are no restrictions. I hope, over the course of the series, we'll hear from many different cultural traditions as well as reflections on the source of the food we're about to eat. One of my favorite mealtime rituals in my own home is the Japanese toast of itadakimasu ("we receive").

Awareness of our dependence on other living things is a principle in responsible eating, and not surprisingly, a study at the University of Minnesota found pre-meal rituals enhance our enjoyment of food. I told the kids that there was scientific proof that attitude is an important ingredient in a good meal.

The class went by so quickly that I forgot to take out my camera until it was clean up time. I snapped a few shots as a father peeked into the classroom.

"Wow," he said. "Washing dishes! How'd you get them to do that?"

No tricks needed. These kids "get" that our class isn't just learning what happens when you combine ingredient A with ingredient B. It's first of all about sharing, and that begins and ends with preparation of ourselves, our food, and our space. As much as possible, I want all of us involved in each process, learning and teaching each other.

But keepin' it real here—I was so exhausted arriving home that I sent my own family out for food! I craved some alone time, and they wanted burgers. And hour later they brought me back one, which I enjoyed with a glass of red wine, and they were both delicious.

What's up for next week? Not sure yet, but the kids' brainstorm (below) gives me lots to choose from!

Recipes

Veggie Quesadillas

From Tilth Community Kitchens Northwest. This makes a great snack after school and only takes a little time to prepare. Roast the veggies ahead of time, or just sauté them with some spices right in the pan.

Serves 6 servings

Ingredients
  • 2 tablespoons oil
  • ½ onion, sliced
  • 2-3 cloves garlic, minced
  • ½ teaspoon salt
  • ½ teaspoon chili powder
  • 1 teaspoon dried thyme
  • 3-4 leaves kale, sliced thin into strips
  • 3-4 leaves chard, sliced thin into strips
  • 1 -1 ½ cups cheddar cheese, grated
  • 6 whole wheat or corn tortillas
Make filling:
  1. Heat a skillet on medium heat. When it is hot, add the oil and sauté the onions and garlic till soft and translucent. 
  2. Add the salt and spices, mix into the garlic and onions to awaken the flavors. 
  3. When the onions are well cooked, add in the kale and chard and sauté for another minute or two until they are wilted and vibrant green in color. 
To assemble and cook quesadilla on stove top:
  1. Place another pan on the stove over medium heat. Place one tortilla in the pan and heat one side for about 30 seconds. Turn over and sprinkle cheese and sautéed veggies on one half of the tortilla and fold in half. Let it heat for about 1 minute then turn over. Once cheese is melted, remove from pan and cut in wedges.
  2. Repeat with the remaining tortillas, veggies, and cheese.
To assemble and cook quesadilla in oven: 

  1. Preheat oven to 325°
  2. Place 3 tortillas on a baking sheet and layer cheese, veggies, and another layer of cheese. Place the other 3 tortillas on top and place in the oven for about 5-8 minutes, or until melted all the way through. 
Eat while hot and enjoy!

***

Warm Berry Sauce with Greek Yogurt

In Austria, simmered raspberries served with vanilla ice cream is called Heibe Liebe (hot love). This simple variation is easy, delicious, and packed with nutrition. Serve it for dessert or breakfast!

Serves 6
  • 3 cups frozen berries
  • 1/4 cup water
  • 1/2 cup sugar (or more if berries are tart)
  • 3 cups plain Greek yogurt
  • 1/4 cup almonds, slivered, chopped, or sliced
  1. Combine berries, water, and sugar in a saucepan. Bring mixture to a boil. Reduce heat to medium-low; gently boil 10 minutes or until sauce thickens. 
  2. While sauce thickens, toast almonds quickly by sautéing over medium heat or placing under hot broiler. Watch carefully to avoid scorching. Remove and allow to cool.
  3. Spoon 1/2 cup yogurt into each of 6 bowls or fluted glasses; top each serving with about 1/2 cup sauce.
  4. Sprinkle with toasted almonds, serve, and enjoy!
***

Wednesday, October 9, 2013

Week One: Deviled Egg Salad


IMG_0459
What a great beginning!

The students arrived ready to listen and learn, and their first task was to put on a nametag and wash their hands. Phyllis had beautified the tables with red runners, and put out bowls of carrot and celery sticks for snacking, while I readied some hot chocolate on the stove (with rice milk as backup should there turn out to be a dairy allergy). As parents of tweens, we knew an afterschool snack is vital, and rather than settling for the Capri Suns and Cheez-Its that are standard-issue with an afterschool program, we opted for our own healthier versions, in line with the philosophy of the class.

While setting up, Phyllis and I discovered we had both bought the veggies (oops!). Fortunately they are inexpensive, but it made me commit to a written shopping list to avoid unnecessary expenditures. Having made several shopping runs already, buying everything from soap to salt, our weekly budget has taken a beating! (And as committed as I am to using organic ingredients, we'll have to balance our "wants" with our "needs" just like any family working with a budget.)

While the kids snacked, I talked briefly about kitchen hygiene and the goals of the course, and shared one of my favorite quotes by Michael Pollan:
IMG_0464
“Food is not just fuel. Food is about family, food is about community, food is about identity. And we nourish all those things when we eat well.”
I am really looking forward to exploring these ideas. The kids then took a brief self-assessment of their skills, signed an agreement to kitchen safety and good hygiene, and then, after donning aprons and reviewing the recipe, they had a mini-lesson on eggs, "mise en place" (the French phrase for "putting in place" the ingredients for a recipe) and chopping, from our visiting subject-matter expert Phyllis (we are so lucky to have her as a volunteer!).

After the eggs were peeled, and then grated on charming vintage graters, we broke into groups to chop veggies and make the sauce. Everyone was hands-on, except for one decent chap who decided to observe only, as he was feeling under the weather and didn't want to share his germs. (Bravo! Excellent decision.)

IMG_0452
Phyllis Rosen of Catering by Phyllis explaining "mise en place"
Our original recipe called for 12 eggs, but after a brief discussion, we decided to double it. Then came the crucial tasting. Not enough salt? Not enough pepper? Hot sauce? Phyllis demonstrated how "a pinch" varies greatly from person to person. I explained the value of "undersalting" and allowing each person to add salt at the table. (Same thing for heat. Some people are "supertasters" who are much more sensitive to flavor than the rest of us, and what tastes mild to us may be too hot for them. Many so-called "picky eaters" are in fact supertasters!)

The kids decided we needed just a bit more salt and pepper, then set out the shakers and Tabasco and sat down to enjoy Deviled Egg Salad. It was delicious on Wasa crisps and crudité (the celery and carrots left from snack). There wasn't a drop left!

IMG_0458We chatted about different things to do with egg salad, and I shared my "busy morning" technique: scramble a few eggs, let cool, add mayo, mustard, capers (or pickles), then serve on toast or put in sandwiches for lunch. It's fast, easy . . . and no waiting for boiled eggs.

After two brief videos (Jamie Oliver on food as music and Bryant Terry on growing your own food), we all pitched in to wash dishes and disinfect the kitchen. Before we could finish, it was 4:30 pm. Class dismissed!

Mary and I completed the clean up and agreed the class went wonderfully well, and the kids—so engaged, respectful, curious—give us hope for the next generation.

They're good eggs.

RECIPE

Deviled Egg Salad

Adapted from www.simplyrecipes.com, this recipe is great for learning chopping skills, comparing organic to non-organic eggs, and experimenting with spiciness. Leftover scrambled eggs can be substituted for grated hard-boiled eggs. 

Serves 8

INGREDIENTS
  • 12 eggs, hard-boiled and peeled
  • 1/4 cup chopped green onion
  • 1/2 cup chopped celery
  • 1/2 cup chopped red bell pepper
  • 3 Tbsp Dijon mustard
  • 1/3 cup mayonnaise
  • 1 Tbsp cider, white wine or sherry vinegar
  • A few drops of Tabasco or other hot sauce
  • 1/4 teaspoon paprika
  • Salt and black pepper to taste
  1. To hard boil eggs, place them in saucepan and cover them with at least an inch of water. Bring to a boil, then remove from heat, cover, and let sit for 10 to 12 minutes.
  2. Into a large bowl, grate the eggs on the largest holes of a cheese grater (or chop finely). Add green onion, celery, red bell pepper.
  3. In small bowl, mix together the mayo, mustard, vinegar and Tabasco.
  4. Gently stir the mayo dressing into the bowl with the eggs and vegetables. 
  5. Add paprika, then Tabasco, salt and black pepper to taste.
  6. Use as a dip, spread, or filling for sandwiches or tortillas.

Monday, October 7, 2013

Welcome!

McClure's Home Ec kitchen, "before"
Welcome to the Farm to Table Class at McClure Middle School. My name is Julie Whitehorn. I'm a mom of one tween and one teen, and I am very excited about teaching kids about where our food comes from and how to cook it. My aim is to also create (through this blog and class materials) a blueprint for others to use, should they wish to emphasize a farm-to-table approach in their cooking classes, or start a class at their neighborhood school.
I believe that one of the best things we can do for our health, our communities, and the planet is to eat whole (fresh, minimally processed) foods. 
Farm to Table Class is a 15-week series that will use resources from Seattle’s Tilth and the national nonprofit Nourish. We will meet October 8 through January 28, except December 24 and 31 (winter break). The project is administered by Seattle Parks and Recreation Department in partnership with the Seattle School District, and funded in part by the Families and Education Levy. It is made possible by volunteers and donations.

Joining me in the kitchen are two dynamite volunteers, Phyllis Rosen (of Catering by Phyllis) and Mary Chapman, a McClure parent and active community organizer. Supporting the project is McClure's wonderful afterschool program leader Doug Berndt, who is helping us make this a success.

Hidden storage under the blackboard
In the past few days, we've been busy getting the school kitchen ready for action. The space looks pretty much the same as it did in the 1980's when my friend Lori learned to cook there in Home Ec class (see "before" photo above). Soon it will be transformed with new supplies, 12 students, and some delectable cooking aromas.

Huge thanks to private chef Lesa Sullivan, my neighbors Eli Forman and Christopher Kashap, and to Phyllis Rosen for donating tools for the kitchen. If you would like to contribute, check out our wish list.

Students, I hope you'll use this website to find recipes and other resources, to post comments, and even, perhaps, to publish a guest post. 

Cheers!