Friday, November 22, 2013

Week Seven: Sweet Potato Hummus and Delicata Boats with Red Rice Stuffing

It jolted me to hear students say they had never tasted a sweet potato. One had never eaten squash. But it should not surprise me, especially coming from children. At TedxRainier last week, I learned from Valerie Seagrest of the Muckleshoot Food Sovereignty Project that the first peoples of our region had over 400 food items in their precontact diet, and now have, on average, fewer than twenty. Twenty!

When I asked the kids in our class how many apple varieties they could name, there were just two: Red Delicious and Granny Smith. Our modern food system has served to decrease the variety of our diets, with enormous consequences to our health and planet. It makes the necessity of classes like Farm to Table very real to me.

It was a privilege on Tuesday to welcome a kindred spirit, Kim O'Donnel, the food journalist, cookbook author, and trained chef, to teach two recipes from her bestselling vegetarian book, "The Meat Lover's Meatless Celebrations."

I thought I was well-prepared. Earlier in the week, our program was given a gift card from Metropolitan Market (thank you, wonderful neighborhood grocer). I shopped at their Uptown store for ingredients, shopped in my kitchen for some spices, and arrived at school in plenty of time to make photocopies, heat water for tea, and begin the mise en place (one of the fancy terms the kids are learning). When Kim arrived, we had a relaxed chat, and I was congratulating myself on having everything ready.

Then she asked, where is the tahini? Yikes! It was on my list but I must have blanked while shopping. I nabbed my purse and dashed to Safeway, two blocks away. Ten minutes and an excruciatingly slow "express" line later, all was well -- until we tried to open the can. The only opener we could find was no match for the deep lid. We took turns. We laughed. We turned the can over and attacked if from the bottom. No luck. Was the entire lesson going to be foiled by an impenetrable tahini can? I was about to try the "Russian hacker method" involving concrete and muscle (very nifty video here) when Phyllis arrived and succeeded with a knife. Thank you, Phyllis!


Crisis averted, Kim acquainted the kids with sweet potatoes, often mislabeled as yams in grocery markets. There are thousands of varieties, but the red-fleshed Garnet or Ruby types are common here, and as tasty as they are beautiful. Inexpensive, low in calories, rich in Vitamin A, beta-carotene, manganese, copper, and potassium, sweet potatoes are a superfood. They also have a low-glycemic index, making them popular for diabetic, macrobiotic, and Paleo diets (without the Thanksgiving marshmallow topping, of course).

Kim had pre-roasted the sweet potatoes for her recipe, giving us an opportunity to discuss the energy consumption of different appliances. Microwaves can use one third to one half the energy of conventional ovens, and make a good alternative for some foods. (Toaster ovens are another good alternative.) While a food's energy "footprint" is typically discussed in terms of the fossil fuels it requires to get from seed to store, there is also a footprint in getting it to the table, and choosing the right tool for the job can reduce energy costs and impact.

The kids had fun preparing and eating the hummus along with slices of fresh jicama and apple.

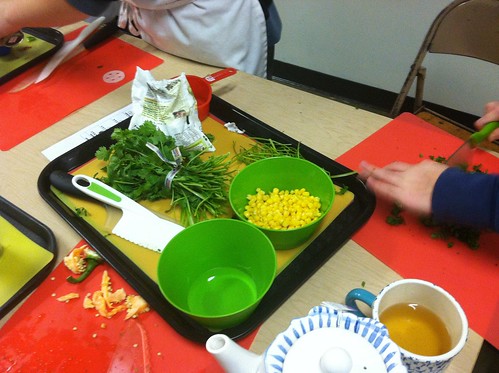
Then came the main dish. With Chloe taking the lead, the kids took turns scraping the skin off ginger (clever trick with a spoon), cleaning out the squash, tasting fennel seeds, and using a citrus zester (getting only the rind, not the bitter pith).

As the delicata and rice cooked, we turned our attention to pesticides, organic farming, and "beyond organic." Kim explores these topics regularly, and gave a good case for buying local foods in season, reinforcing the themes in the Nourish documentary.

I introduced the "Dirty Dozen" list, published annually by The Environmental Working Group. It lists produce that tests highest and lowest for pesticides (curiously, sweet potatoes, unlike conventional potatoes, test low, as do onions). Because organic foods are often more expensive, the budget-conscious consumer can use this information to decide where to spend their food dollars. Each student got a copy to take home and put on the fridge, or in a parent's wallet.


Of course, foods available from local farms are often "better than organic" (going beyond the federal standards). These are common at farmers markets and through CSA's, or Community Supported Agriculture, the source of many "food boxes" that arrive on Seattle porches during the week. (Mine is from Local Roots Farm, and happens to be heavy this week with  . . . delicata squash.)

It took longer than expected for the squash to soften in Cranky Oven, but when Kim deemed it ready, we hastily filled it, cut it, and served it up, while Plate Lead Emma set a pretty table. Joe, our Gratitude Lead, gave a warm thank you to Kim and the farmers who grew our ingredients. It was a fun and tasty lesson. Mary snapped this photo (missing a few) of our merry band saying "DELICATA!"

Next week, McClure has parent-teacher conferences and there is no class. The following week, Chef Lesa Sullivan-Abajian is coming to walk us through soups and salads. Or something the kids have never tried. The future looks bright.

Sweet Potato Hummus

From Kim O’Donnell’s The Meat Lover's Meatless Celebrations
Ingredients:
  • 2 pounds orange-fleshed sweet potatoes (also sold as garnet or jewel yams)
  • 1 medium-size yellow onion
  • Olive oil, for brushing
  • 1 clove garlic, minced
  • 2 tablespoons tahini
  • 1⁄4 teaspoon paprika or other medium-heat ground chile pepper
  • 1⁄2 teaspoon salt
  • 2 to 3 tablespoons freshly squeezed lemon juice (about 1⁄2 medium-size lemon)

Directions:

  1. Preheat the oven to 400°F.
  2. Wash and scrub the sweet potatoes. Cut into 3- to 4-inch pieces, regardless of the width. Keep the skins on.
  3. Slice the onion in half and peel. Brush the onion and sweet potatoes with olive oil and place in a baking dish in a single layer. Cover with foil and roast for 1 hour; the sweet potatoes should be extremely tender.
  4. Let cool for about 10 minutes. Peel off the skins of the sweet potatoes.
  5. Place all the roasted vegetables in the bowl of a food processor or heavy-duty stand blender and puree. Add the garlic, tahini, paprika, and salt and blend. Then gradually add 2 tablespoons of the lemon juice and taste. Add more as needed.
  6. Serve at room temperature with chopped fruits and vegetables: apples, bell peppers, celery, endive, jicama, and pears are all great dipping companions.
  7. Keeps well in an airtight container in the refrigerator for at least 3 days. The garlic flavor deepens with time.

Delicata Boats with Red Rice Stuffing

From Kim O’Donnell’s The Meat Lover's Meatless Celebrations
Ingredients:

  • 1 ½ cups water
  • 1 cup Bhutanese red rice (Plan B: long-grain Wehani; cooking times and liquid amounts may vary)
  • 3 to 4 delicata squash (about 1 pound each)
  • ⅛ cup olive oil, plus extra for brushing
  • ¼ teaspoon salt, plus more to taste
  • Freshly ground black pepper
  • ½ cup fresh flat-leaf parsley, chopped
  • ¼ cup unsalted shelled pistachios, chopped (Other options: walnuts, almonds, or pecans)
  • ⅓ cup dried cranberries or cherries, chopped
  • 1 teaspoon fennel seeds
  • 1 teaspoon peeled and minced fresh ginger
  • Zest of ½ lemon or orange, plus 1 or 2 squeezes of the juice
  • ⅛ teaspoon ground chile pepper of choice

Directions:
  • Bring the water and the rice to a boil in a medium-size saucepan. Lower the heat to low, cover, and cook at a simmer, 20 to 25 minutes. The rice will be done when water is absorbed and grains are tender to the bite.
  • Preheat the oven to 400°F and line a baking sheet with parchment paper. Trim both ends of each squash and slice in half lengthwise. Scoop out and discard the seeds and the attached pulp. Brush both sides of the squash with the olive oil, and season the inside to taste with salt and pepper.
  • Roast until easily pierced with a fork, about 30 minutes, and remove from the oven. Lower the oven heat to 350°F.
  • While the squash roasts, make the filling: Transfer the rice to a large mixing bowl and add the ⅛ cup of olive oil, and the parsley, nuts, dried fruit, fennel seeds, ginger, citrus zest, and chile pepper. Stir until the rice is coated with the oil and the mixture is well mixed. Add the ¼ teaspoon of salt, stir, taste, and reseason if necessary.
  • Fill each squash half with about ¼ cup of the filling. Return to the oven and heat for about 15 minutes, until the rice is warmed through.
  • Serve immediately, or lower the oven temperature to 225°F, cover with foil, and hold until ready to serve.

Saturday, November 16, 2013

Week Six: Gluten-free Granola Parfaits and Hearty Vegetable Chili

IMG_0750[1]One of the unexpected benefits to teaching this class is learning more about local organizations doing good things for food education. Flagship Foundation Pure Food Kids Workshop is a stellar example. Having worked with Kurt Dammeier while building our neighborhood farmers market (his iconic mobile "pig" restaurant, Maximus/Minimus, was a regular feature, and Pasta & Co hosted our staff parties), I was eager to see how his foundation worked in the classroom.

To date, more than 50,000 kids have participated in their workshops, both in Seattle and New York City metro areas. Advertising-free and at zero cost to the participants, the workshop teaches kids how to become "food detectives" while reading labels and making a simple, nutritious vegetarian chili. Flagship is funded by donations as well as one percent of the sales from Dammeier's Sugar Mountain enterprise, which includes Beecher's, Pasta & Co, Bennett's Pure Food Bistro, Maximus/Minimus, plus soon-to-open restaurants, a patisserie, and a sausage biz.

Kristin Hyde, the program's affable and unflappable executive director, targets the curriculum to fourth and fifth graders, but she kept our middle school students completely engaged (with a tween at home, she totally "gets" their humor and attention spans). From a tote bag full of junk food, she pulled several technicolored snacks and asked the kids to read the nutrition labels. They explored the ins and outs of calories, serving sizes, hydrogenated oils, preservatives, additives, and those sneaky sugar grams.

With four grams in each sugarcube, consider the sugarload in these drinks:

Powerade (32 oz) = 56 grams or 14 sugarcubes
Coke (20 oz) = 65 grams or 16 sugarcubes
Vitamin Water (20 oz) = 32.5 grams or 8 sugarcubes

Sugar Stacks has side-by-side photos to help visualize the grim reality. That tiny cup of yogurt has the equivalent of seven sugarcubes! Yogurt does not need that much sugar to be delicious, and proof positive was the delight with which the kids gobbled up their pre-lesson snack of yogurt-applesauce-granola parfaits. Fruits are already sweet, and so is dairy. Lightly sweetened granola (with whole grains and nuts) mixed with applesauce and yogurt is a nutritional powerhouse.

I've included my favorite granola recipe below. We didn't have time to make it in class, but it's very simple to prepare. The coconut oil and nuts are heart-healthy; the sweetener can be adjusted to taste, and it stores well in an airtight container. Even a tiny parfait glass (see photo below) was filling enough that some of our students had little appetite left for their chili. I made a note of that.

IMG_0743[1]

Kristin provided each student with a lunchroom tray, silicone cutting board, and plastic knife. With the addition of a hot plate (not needed as we have the Cranky Oven), this set-up is ideal for teaching outside of a kitchen. The kids were soon busy with chopping and dicing veggies and rinsing beans and measuring spices, and it was an opportune moment to reinforce lessons on mincing, dicing, and chopping.

The Flagship Foundation chili recipe calls for canned beans, but as we discussed last week, soaked beans are excellent, inexpensive, and always BPA-free; they just take a little planning.


Random class and pdx
As the chili bubbled on the stove, Kristin led the kids in a lively discussion of nutrition. While the science of nutrition is hotly debated and still poorly researched (with many studies still relying on self-reported food diaries), there is broad consensus around the need for less sugar and carbohydrates, and more plant foods and diversity. The rainbow of colors in the chili was a perfect example.

You might notice the teapots on the table, courtesy of Goodwill. This week, the students tried cucumber white tea, and loved it. Zero sugar grams, people!

If you know of an elementary school, public or private, or a homeschool group that would benefit from the Pure Food Kids workshop, email Kristin
***

Gluten-free Granola Parfaits

This fail-proof recipe is adapted from Cannelle et Vanille.
  • 3 cups gluten-free rolled oats
  • 1 1/2 cups nuts and seeds (choose your favorite mix of slivered almonds, pistachios, pecans, walnuts, cashews, black and white sesame seeds, poppy seeds, chia seeds and flaxseeds)
  • 1/2 cup apple juice, unsweetened
  • 1/2 cup honey or maple syrup
  • 1/4 cup coconut oil
  • 1 tablespoon vanilla extract
  • 1/2 teaspoon ground cinnamon
  • 1 teaspoon fine sea salt
  • 1/4 teaspoon black pepper
  • Greek yogurt, unsweetened
  • unsweetened applesauce or other fruit
  1. Preheat oven to 325 degrees.
  2. Combine the oats, nuts and seeds in a large bowl.
  3. Combine the apple juice, maple syrup, coconut oil, vanilla extract, cinnamon, sea salt and black pepper in a medium saucepan. Gently heat all together until salt is dissolved and coconut oil liquified. Pour liquid over the dry ingredients and toss to coat. Spread the mixture evenly on a baking sheet lined with parchment. 
  4. Bake for 40 minutes until golden. Make sure to stir the mixture about every 15 minutes to make sure it is evenly baked.
  5. Let the granola cool completely. It will become crunchier as it sits. Store in an airtight container for a few weeks.
  6. For parfaits, layer with yogurt and applesauce (or other fruit) in tall glass.
***

Hearty Vegetable Chili

From the Flagship Foundation, this chili can be varied by adding cooked ground beef, chicken, additional vegetables or spices. Serves 6.
  • 1 tablespoon olive oil
  • 1 cup onion, chopped
  • 4 cloves garlic, minced
  • 1 cup red pepper, chopped
  • 1 cup green pepper, chopped
  • 1 tablespoon chili powder
  • 1-½ teaspoons dried oregano
  • ¾ teaspoon ground cumin
  • 1 teaspoon salt
  • ¼ teaspoon black pepper
  • 1 15.25 ounce can black beans
  • 1 15.25 ounce can kidney beans
  • 1 28-ounce can whole tomatoes
  • 1 cup fresh or frozen corn kernels
  • ½ bunch cilantro
Directions:
  1. Heat oil in medium pot over medium-high heat.
  2. Add onion and garlic and cook for 1 to 2 minutes.
  3. Add peppers to the soup pot and sauté until tender.
  4. Add spices and stir until all of the vegetables are coated.
  5. Add beans and stir until the beans are coated with the spices.
  6. Cut tomatoes into bite sized pieces, add to the soup pot, and stir. Turn the heat up to high and bring the soup to a boil. Reduce the heat to low and simmer for 20 minutes.
  7. Add corn to the soup pot and stir. Add up to 1 cup water if the chili looks too thick. Simmer for 5 minutes.
  8. Chop cilantro. Turn off the heat on the soup pot and add the cilantro. Stir the soup and enjoy!

***

Thursday, November 7, 2013

Week Five: White Bean Dip and Flourless Raspberry Chocolate Cakes

Cooking class week 5Sometimes things go wrong. As in frying my laptop keyboard with hot tea, or jinxing the copy machine ten minutes before class. As in promising our guest the ingredients for her raspberry chocolate cakes but leaving the raspberry part on my kitchen counter. As in buying the wrong kind of chocolate (semi instead of bittersweet) and mispronouncing her name, and then encountering a cranky oven, and having three students not show.

Oy. Vey. 

But among friends, everything gets worked out. My son loaned me his computer to prepare for class. A kind sub unjinxed the copier. Phyllis cut celery and steamed broccoli for the snack while I rushed home (three blocks away) for the jar of homemade raspberry preserves. Our guest, my dear friend Nina Laden (it's Layden not Lahden!) dismissed my chocolate error as unimportant, and we conquered Cranky Oven by constant vigilance and the switching of racks.

The absent students meant we had more cakes to share. There were enough for the kids and volunteers, plus our program coordinator Mr. Berndt, plus the awesome Mr. Clark (who lets us screen movies in his classroom). The aroma of baking chocolate drew several curious hall-dwellers, and I found myself wishing we had made 50 cakes, instead of 18.

Nina, Cooker of Books and Other Treats 

So first a word about Nina. She is a best-selling, award-winning children's book illustrator and author (among her books are Private I. Guana, When Pigasso Met Mootisse, and my favorite, The Night I Followed the Dog). She brought a preview copy of her newest book, Once Upon a Memory, which is stunning (my daughter says it will be an instant classic, and I think she's right). Nina is also a prolific food gardener in Ballard and on Lummi Island. She grows, forages, cooks, bakes, and preserves food of all kinds, and has a particular interest in gluten-free dishes, as her husband has celiac.

It seemed like a good idea to start off with a gluten-free snack: crudités with a dip of puréed Navy beans, lemon, garlic, and parsley. I explained the difference between starting with raw beans or canned. Many prefer the taste and texture of the former, which you can buy cheaply in bulk. If you buy canned, buy Eden, as it's currently the only brand that is BPA-free. We discussed different kinds of legumes--a new word for the kids--and how they can be "quick cooked," with instructions for doing so on the back of their recipe handouts (also below).

Nina showed the kids an elegant scarlet runner pod with its shiny, speckled beans. She harvests hers for cooking in chili.


Hungry Kids or Tasty Snacks? 

As the kids snacked and sipped hot tea (this time, apricot), we reviewed our recipes and discussed the ingredients. Parents, you will be pleased to know that by the end of this task the veggies were devoured, and most of the bean dip, as well. I can't figure out if these are unusual children, really hungry children, or we are striking gold with these snacks.

Among the new terms this week: vegan, gluten-free, cannelini, Navy bean, legume, zest, drizzle, ramekin, preserves, jam, heavy cream, whipping cream.

Nina is a natural with kids. She kept up a running dialogue as she and Prep lead Sophie supervised the buttering of ramekins, melting of chocolate, and tempering of eggs. I'm pretty sure the kids will remember the word "temper," as we've used it several times now with eggs. In a future class, I hope we have the opportunity to show them chocolate tempering, which is heating and cooling so the results will be firm and glossy at room temperature.

Everyone took turns whisking the batter (in my mind's eye, I could see Maurice Sendak's chubby cooks shouting "and nothing's the matter!"). They scooped the batter into the ramekins with a half-cup measure, dripping here and there.

"Everything fun is messy," said Nina. Spoken like the artist she is.

Then into the oven went the cakes, with cell phones employed as timers, since Cranky Oven can't be trusted with keeping time or temperature.

Not Just Any Old Chocolate 

After a short break, we welcomed our second guest, my friend Lauren Adler, the genius behind Chocolopolis. I remember when the store opened in 2008. With its jewel box interior, orange and chocolate colored accents, pretty lights, and exotic packages, it looked like a Parisian parfumerie, and for someone like me, who likes her aromas to be edible, a slice of heaven. Although it seemed either optimistic or silly to sell high-end chocolates as the economy was tanking, when I got to know Lauren, I realized it was just smart. She knew that small pleasures become even more necessary in an economic recession, and her store is unique, offering a wide variety of brands as well as made-in-house truffles. (Like Johnny Depp in the movie Chocolat, my favorite chocolate is drinkable, especially in the middle of a winter walk around the neighborhood. Just writing that, I'm salivating.)

Our students being kids, when asked what their favorite chocolate was, responded "milk" and "white" and "Snickers" and other such blasphemies. Lauren just smiled. She has heard it all. (Earlier, a student asked "will there be something for those who don't care for chocolate?" Nonetheless, I saw her enjoying Lauren's 70% samples, and later, devouring a semisweet cake. Perhaps her tastebuds just needed recalibrating after Halloween.)

Lauren walked us through the story of cacao: growing, harvesting, fermenting, etc. She included a primer on the commodities market and fair trade that swirled above my head but fortunately, she wrote it all down here, and I can learn more through the classes she offers at the shop. The bottom line is that "fair trade" is complex.

The children got to touch a cacao pod, taste different varietals, nibble on roasted nibs, and learn about cacao "mucilage" (a word I associate with elementary school glue, in a little bottle with a red rubbery lid that was fun to pick at).

Suddenly three cell phones trilled: the oven timers going off in concert. It was time to whip the heavy cream (using Alice Merdrich's tips, below) and serve up dessert, with Plate lead Chloe festooning each cake with a dollop of cream and a fresh raspberry.


Everything Tastes Better With Gratitude 

Seated, spoons poised over their ramekins, the kids waited until all the dollops were dolloped and raspberries planted, and the green light given to our Gratitude lead, Matthew, to say a few words. A few noses were bent close to cakes, inhaling the sweet perfume. Matthew asked those with hovering spoons to please put them down so he could continue. They did. Satisfied, he thanked the cacao farmers and the entire supply chain that brought us the cakes. 

For a few moments, there was only the scraping of spoons and sighs of satisfaction. The hot, pudding-like cake was sweet (but not overly, to my surprise). The unsweetened whipped cream was a perfect foil. A few kids wondered if they had run into eggshells.

Eggshells? No, raspberry seeds!

I didn't notice them, myself, but for the sensitive (some people can't stand seeds), a strained jam or jelly  could be used.

Glory be, we finished eating in time for dishes. Our KP lead Eliot managed to get a large number of dishwashers, but I was surprised to see they were all female like herself. That will never do, I thought.

With a gentle--I hope--tone, I told the boys (already on their cell phones): a man must never be idle while a woman works. They protested that they had been turned away at the sink.

Well, that will never do, either.

"Girls," I pleaded. "Always welcome help."

I'm not sure they heard me, or understood. This sharing of the chores bit is going to take some practice.

At 4:30 pm, I lowered the lights to bring everyone to the door. The kids joined me in an impromptu song of "thank you very much" for our guests, and then sped down the hall with their backpacks, several of them texting in transit.

It pleased me to see Nina and Lauren chatting as Mary and I finished up.

The next best thing to having wonderful friends is introducing them to each other.

***

RECIPES

White Bean Dip

This easy, simple, vegan dip recipe is adapted from Treehugger.com


  • 2 (15 ounce) cans Cannellini or Navy beans, drained and rinsed
  • 1 clove garlic, smashed
  • ¼ cup roughly chopped parsley, plus 1 teaspoon finely chopped, divided use
  • 2½ teaspoon lemon juice
  • ¼ teaspoon lemon zest
  • ½ teaspoon salt
  • ¼ teaspoon black pepper
  • ½ cup olive oil, plus a drizzle, divided use
  1. Place the beans, the garlic, the ¼ cup roughly chopped parsley, the lemon juice and zest, the salt, pepper (and, if using as per the original recipe, chopped crispy bacon) into the bowl of a food processor and process until well combined and mostly smooth; with the processor running, begin drizzling in the ½ cup of olive oil, and process until the dip is completely smooth.
  1. Spoon the dip out into a bowl, and finish by sprinkling the top with the remaining 1 teaspoon of finely chopped parsley and a drizzle of the olive oil.
***

How to Quick Cook Dried Beans

Follow this fast and easy method for cooking dry beans without soaking overnight.


Makes 4 cups.

  1. Put 2 cups beans in a large pot.
  2. Cover with 8 cups of cold water.
  3. Cook over high heat to rolling boil. Boil 2 minutes. Take off heat and cover. Let sit for at least 20 minutes.
  4. Drain beans and rinse in cold water. Your beans are now ready to use in any recipe calling for "soaked beans."
  5. To fully cook beans for puree or other recipes which call for canned beans, add cold water to drained bean to cover by 1 inch. (Do not add any salt yet, because that can prevent beans from softening. Return to stove and heat until they are simmering. Cook for 2 or more hours, until soft.

Flourless Chocolate-Raspberry Cakes

Recipe from children's book author and illustrator Nina Laden, adapted from Food & Wine.
  • 8 ounces bittersweet chocolate chips
  • 14 tablespoons butter (1 stick plus 6 tablespoons)
  • 2 tablespoons raspberry preserves (or about 1/3 cup fresh raspberries mashed with 1 tablespoon sugar)
  • 4 large eggs
  • 1/4 cup sugar
  • 1 tablespoon vanilla extract
  • heavy cream for whipping
  • fresh raspberries for topping
  1. Preheat oven to 325ºf. 
  2. Butter 6 3/4-cup Pyrex souffle cups. Arrange cups on a baking sheet. 
  3. In a medium-sized saucepan, mix chocolate chips, butter and preserves over low heat until all has melted. Remove from heat, cool to lukewarm, stirring often- for about 10 minutes. 
  4. Whisk the eggs, sugar and vanilla in a large mixing bowl to blend well. Gradually whisk in the chocolate mixture. 
  5. Divide batter among the buttered Pyrex dishes. (I use a 1/2 cup stainless measuring cup to pour the batter--it works well.) Bake the cakes until a toothpick comes out with some moist batter on it--about 20 minutes. Let cool 30 minutes (centers will fall) --and serve warm or room temp topped with fresh whipped cream and raspberries. Enjoy!
***

Alice's 5 Rules for Better Whipped Cream


By Alice Medrich

1. Use heavy whipping cream. The best and freshest tasting cream is not ultra-pasteurized or sterilized, or stabilized with carrageenan. If possible, find the brand that has only one ingredient: cream.

2. Cream must be very cold to whip properly. If you’ve just brought it home from an extended trip to the store, refrigerate the cream for a while again before you whip it. Cream that isn’t cold enough may not whip at all, or it may curdle when you whip it. For extra insurance: chill the bowl and beaters before whipping the cream.

3. You can sweeten the cream with plain granulated or powdered sugar. I prefer granulated sugar because I don’t like the feel and flavor of the starch that’s in the powdered sugar, but this is up to you. Taste and adjust the sugar towards the end of beating because cream tastes less sweet when it’s fluffy than when it’s fluid.  

4. Whipped cream can be thick and stiff or soft and flowing, or anywhere in between: this is up to you! However, cream that is too stiff feels grainy from the specks of butter -- so don’t go too far.

5.  If you plan to pipe whipped cream with a pastry bag or spread it over a cake for filling or frosting, or fold it into another mixture, always whip it less stiff than you want it to be. Cream continues to stiffen as you pipe it, spread it, or fold it: if you begin with stiff cream, you will end with granular over-whipped cream by the time you are finished.


***


Friday, November 1, 2013

Week Four: Bugs in a Boat and Pumpkin Spice Ice Cream

Rob Gardiner, the "ice cream guy"
When Queen Anne neighbor Rob Gardiner offered to make ice cream with the class, I leapt at the chance. Years ago, Rob brought his swing dancing group to a farmers market I was directing, I recall how charming it was, on a lovely day in May, to see people dancing on the sidewalk as our vendors set out their radishes and sweet peas. Here's some video from that event. Rob would not be able to recreate that magic, exactly, but ice cream from scratch is not a bad substitute.

We discussed different flavors and settled on pumpkin spice, in keeping with the season and current craze for all things pumpkin spicey (Google it if you dare). I briefly considered roasting a squash and making the puree, but if you've done this, you know pumpkin can be fickle, often too watery or stringy, unless you are lucky enough to know a farmer who grows Winter Luxury pumpkins, which make a beautiful and tasty puree. As my two Winter Luxuries are destined for Thanksgiving, canned pumpkin, (actually a mix of squashes), would have to do.


Winter luxury squash, photo by Seed Savers Exchange
While Rob assembled his mise en place, the kids made Bugs in a Boat, a variation of Ants on a Log (celery sticks with peanut butter, topped with raisins, dried cranberries, and peanuts). They washed it down with unsweetened herbal tea. Yes, you read that right. Unsweetened. I'd been warned that kids would refuse tea that lacked honey or sugar, but having had success at home, I wasn't too concerned. Mildly fruity water may even be a welcome pause from the sugary beverages they are offered 24/7, from juice boxes and "Vitamin Water" to sports drinks and sweetened milks.


It's musical
Tazo's Passion tea (with hibiscus, orange peel, and licorice) is mild, red, and frankly, fun to play with. Tea is as much ritual as beverage: unwrapping the teabag like a little present, dipping it into a cup, waiting for the kettle to whistle, pouring the water, watching it take on color, testing it, adding an ice cube if it's too hot. What's not to like? It's a small lesson in mindfulness, and the class kitchen's vintage Revere kettles are pretty fun, too.

Blood sugar stabilized, the kids were ready to review the recipe, practice doubling it on paper (math! fractions!), and discuss the ingredients line by line. This is a fun exercise, as almost every ingredient is processed in some way, even if only by washing. But is canning pumpkin preferable to freezing? How much processing does cinnamon require? How is organic sugar different? Recipe review is one of my favorite parts of the class, as the kids are eager participants. We don't always have the answers, but the practice of asking is a good thing in itself.

Rob, with his student sous chef Chloe, then demonstrated several techniques: how to warm eggs that are cold from the refrigerator by placing them in a bowl of hot (but not boiling) water, how to use an egg separator, how to grate cinnamon and nutmeg on a microplane, how to prepare a double boiler, how to temper eggs, and two different ways to determine when a custard is done (by appearance for the pro, by thermometer for the rest of us). 

Student brainstorm
Rob also gave the kids some fun facts about ice cream history and varieties. Given time constraints, we skipped the ice bath to cool the custard, and Rob poured it warm into his nifty compressor machine. It made a significant racket, so we closed the doors and sat down to talk about the documentary we saw last week. 

When I handed out worksheets from the Nourish curriculum (an excellent resource!), I could see the lights dim in their eyes.

"Are we going to be tested on this?"

I reassured them that this was just a tool to help them learn, and there would be no test. They visibly relaxed. As middle schoolers, they have been inundated with standardized tests lately, and I felt sorry for them.

Our volunteer "professor" Erik directed a dialogue on how to improve the food system (he recorded a few ideas on the white board, pictured above). Every child was engaged, offering examples of how they personally could take action. They may be too young to vote in elections, or make purchasing decisions, but they are still influential in "voting with their forks." One of my favorite suggestions was "buy more organic and they'll make more."

Soon it was time for ice cream, so papers and pens were whisked away, and as Rob scooped, our Plate lead Darien added a gingersnap to each bowl. Again I was pleased again that everyone waited until all were seated and served--and thanks was given (by Gratitude lead Emma)--before savoring their treat. Great job, kids! Delaying gratification is such an important skill.

The ice cream got a thumbs up, even though it was more soupy (given our rush) than icy. KP lead Eliot, deprived of a job last week, began supervising clean up, but before we could even dry a dish, class was over. (I'm still working on time management. One of these weeks, we'll get the kitchen clean before the bell rings.) The students left happily, laughter echoing in the hallways.

Not five minutes had elapsed when an unfamiliar student poked her head into the classroom, looking hopeful.

"I heard you guys made ice cream. Got any left?"

Nope, not even a quarter teaspoon. We encouraged her to sign up for the next class, in February.

***
RECIPE
Pumpkin Spice Ice Cream

Adapted by Rob Gardiner from “The Ultimate Ice Cream Book” by Bruce Weinstein, this recipe is not only a sure-hit with kids, it's an opportunity to discuss the science of emulsions, to practice separating and tempering eggs, to use a double boiler and an ice bath, and to judge doneness by look, feel, and thermometer.  


  • 1 cup whole milk
  • 1 cup brown sugar
  • 1/8 tsp sea salt
  • 5 egg yolks
  • 1/2 tsp ground cinnamon (fresh ground preferred)
  • 1/4 tsp ground nutmeg (fresh ground preferred)
  • 1/4 tsp ground ginger
  • 15 ounce can unseasoned pumpkin puree
  • 1 tsp vanilla extract
  • 1 cup heavy cream

    1. Place saucepan with one inch of water over high heat until boiling. Lower heat to medium and keep at a simmer.
    2. Combine milk, sugar, and salt in another saucepan and cook, stirring, over medium heat until steam begins to rise and you see a ring of small bubbles around the edge of the milk.
    3. Prepare an ice bath in a large stainless steel bowl. Fill halfway with ice cubes and cold tap water.
    4. Whisk egg yolks in a medium stainless steel bowl until they are pale yellow. Temper eggs by slowly whisking warm milk mixture into egg yolks. Place bowl over saucepan with simmering water. 
    5. Whisk constantly until mixture reaches 175 degrees on an instant read thermometer. Do not let tip of thermometer touch bottom of bowl. Do not allow mixture to boil.
    6. When mixture reaches 175 degrees, carefully remove bowl from saucepan and place in ice bath. Whisk mixture while keeping bowl partially submerged in ice water until cool.
    7. Add spices, pumpkin, and cream to egg mixture. Stir until combined. Cover tightly with plastic wrap and chill in refrigerator, preferably several hours or overnight.
    8. Add vanilla extract and stir to combine. Pour mixture into ice cream maker and churn according to manufacturer’s directions. Eat immediately as soft serve, or spoon into plastic containers, cover with wax paper and lid, and freeze until firm.

      Enjoy!

    ***